If you have an app idea that keeps you awake all night, then you are not alone. You must have dreamed, like many other people, of creating an application that makes people’s lives easier. As a matter of fact, developing an iOS app in 2026 is only for the tech experts anymore. You can really turn your idea into a real product with the right plan and tools.
Let’s uncover some details and walk through how to build a successful iOS application step by step.
Why Building an IOS App Still Makes Sense in 2026
Many people with ideas think that the app market is overcrowded, but that’s not true. There is still a lot of demand for high-quality iOS apps. As per the research, Apple users spend more time using apps than Android users. They expect secure and smooth experiences.
Your app can surely find its place if it can solve a real problem or freshly delivers value. iOS app development will give you a profitable platform, whether you are a business owner wanting to connect with customers or a startup owner with a new idea.
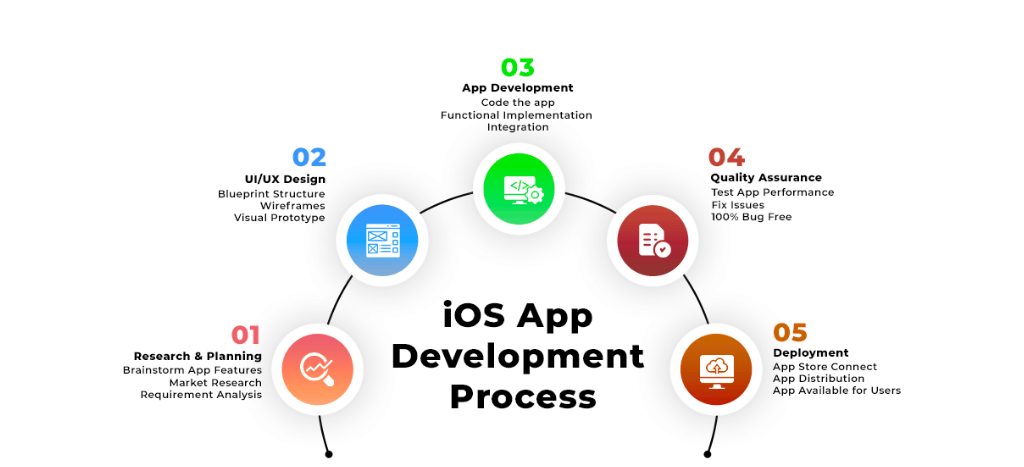
How to Build a Successful IOS App Step by Step
Here is a clear breakdown of the process in simple steps that you can easily follow.
Step 1: Start with a Strong Idea
The idea is where everything starts. You need to ask yourself the following questions:
- What problem does my app solve?
- Why would someone download my app instead of another app?
You don’t have to find a whole new solution. Sometimes, even improving the existing solution is enough. For that, you need to talk directly to the users and ask them what frustrates them most about similar applications. Their feedback will help in building your concept and avoiding possible mistakes that can occur later.
Step 2: Research the Market and Competitors
Take as much time as you can to study the market before you even think about spending a single dollar on development. Search the App Store and look for apps that are doing something similar to your idea. Read their reviews and user ratings to find out what users love and what they are complaining about.
You will have a clear direction by doing this research. You will know what you will need to improve in your own app, what you need to skip, and how to place your iOS app as something useful for people.
Step 3: Plan the Features
App features are like ingredients in a recipe. If you add too much, the taste will get confusing. In simple words, you need to focus on what your app needs the most for version one. Create a list of important features and separate one for nice-to-haves.
Important ones can include user login, search, notifications, and payments. The rest of it can be a dark mode feature or fancy animations that can wait. Always start small and add more when you have an idea of how users are responding.
This stage is called Minimum Viable Product (MVP), which is your first performing version that you can use to test your concept without emptying your bank.
Step 4: Choose the Right Development Approach
Now comes the big decision-making. Do you want your app just for iOS, or want to use a cross-platform tool like Flutter or React Native?
- Native iOS development (using Swift or SwiftUI) will give you the best performance and full access to Apple features.
- Cross-platform development will save time and money if you also want an Android version later.
If you aim to create a top-tier app that provides a great experience, then native is worth it. But if your budget is less and the timeline is short, then a cross-platform framework can deliver you the best results as well.
Step 5: Design for Simplicity and Flow
Great design isn’t about decoration. It’s about experience. Apple users expect apps that look neat and feel intuitive.
When you start designing your app, focus on:
- Consistent buttons and spacing
Tools like Figma or Sketch make this process easy. If design is not your strength, then hire a UI/UX designer or an agency that understands the Apple Human Interface Guidelines. A small design mistake can confuse your users, but a clean design will build trust instantly.
Step 6: Develop and Test Your App
This is the step where your idea turns into code. Many iOS app development companies use Xcode, which is Apple’s official tool. This tool supports Swift, has a simulator for quality testing, and lets you manage your project easily.
Testing is just as important as developing. Try your app on different devices, from older iPhones to the latest models. Catching bugs early saves time and embarrassment later. Use TestFlight, which is also Apple’s testing platform, so you can get feedback from real users before launch.
Step 7: Prepare for App Store Launch
Once your app starts working perfectly, it’s time to submit it to the App Store. Apple has strict rules, so read their App Store Review Guidelines carefully.
Create a clear app description, attractive screenshots, and a short demo video if possible. These small details can boost downloads. Your title and keywords matter too, as they affect how easily users can find your app.
Step 8: Market and Maintain Your App
Know that launching your app is just the beginning. You will have to promote your app, so you can reach your audience. What you should do is post about it on all your social media platforms, reach out to tech blogs for promotions, and ask your friends to share it. You can also consider a small paid campaign to test what works best.
Track analytics closely after the launch. Notice how users interact with your app, what features they use most, and where they drop off. Regular updates and bug fixes will keep your app relevant and earn better reviews over time.
Have an iOS App Idea? Let’s Turn It Into a Market-Ready Product
Building a successful iOS app isn’t just about development it’s about launching the right product with the right strategy. If you’re ready to validate your idea, reduce risk, and build an app users actually love, now is the time to take action. Our experts at Optimal IT Solutions help businesses move from concept to launch with clarity, speed, and scalability.
Best Tools for iOS App Development in 2026
Now in the year 2026, development companies have access to better tools than ever. Here are a few you should definitely know about:
- Xcode: Apple’s official development environment for Swift and SwiftUI. It’s powerful and built for iOS development.
- Swift: The main programming language for iOS app development. It’s fast and beginner-friendly.
- Firebase: It’s a tool by Google that helps you with app analytics, push notifications, and real-time databases.
- Figma: it’s for designing and prototyping your app’s user interface.
- TestFlight: It’s for beta testing your app with real users before you launch publicly.
These tools simplify your app development and reduce headaches. You don’t need to use all of them. However, knowing about all the options you have will help you make a more informed decision.
How Optimal IT Solutions Helps Businesses Build Successful iOS Apps
Building a successful iOS app requires more than just coding it demands strategy, user-focused design, and scalable development. Optimal IT Solutions follows a structured approach that prioritizes idea validation, intuitive UI/UX, performance optimization, and long-term growth. By combining technical expertise with market insights, businesses can launch iOS apps that deliver real value and sustainable results.
Final Thoughts
In 2026, creating a successful iOS app that people enjoy is no more about being a talented coder. It’s all about solving a real problem and giving people what they are asking for.
Don’t forget that the best apps continue to improve through feedback and updates. So, stay focused, and your app will surely stand out in the saturated App Store.
The best time to do it is now. The tools are already there. So, follow this iOS development guide and give your idea a chance to succeed.
FAQ's